How to Create a Weather Forecasting Bot using Google Maps and Zapier
In this tutorial, we are going to be creating a bot that allows users to enter a town or city and the bot will then pull back and display the weather for that particular location.
In this tutorial, we are going to be creating a bot that allows users to enter a town or city and the bot will then pull back and display the weather for that particular location.
Tutorial Level - Intermediate - you need a basic knowledge of The Bot Platform, Zapier and Google Maps.
You will need:
A bot platform account
A Workplace instance with admin access
A Zapier account
A Google account
Step 1:
First you need to create a bot by following the instructions on the bot platform blog on how to set up your bot on workplace. For this tutorial, you should start with a blank template and create a new integration on your workplace account. https://help.thebotplatform.com/getting-started/quickstart-for-workplace-bots
Step 2:
Now we have our blank bot set up and integrated with our workplace instance, we can start creating the integrations we need.
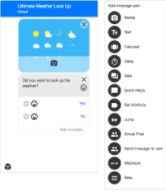
Start by creating a welcome message for your bot. In our example, we have included an image and a text option with two buttons for yes and no. You need to set the button to send the user a message and set the reply message as ‘Location’.
Step 3:
Now we need to set up the message that collects the address. Create a Q&A message that asks for the weather. Click on the settings option and select save user attribute and send a message.
Save the information with a new user attribute called ‘Location’.
Set the response message to be ‘Weather Details’ and click save.
Step 4:
Let’s edit the new Weather Details message. In our message we added a text introduction that says ‘Great, let’s look up the weather’. This lets the user know that the bot is doing something while the next stage of the look up happens.
We now need to add a webhook. Add a webhook from the bot platform options on the right.
Now we need to go to Zapier.
Step 5:
We need to create a new Zap that collects the data from our bot and produces a suitable weather report.
Search for a webhook trigger on Zapier. Click on the webhook icon and select Catch Hook as your option. You will then be given a webhook URL. Copy this URL to your clipboard and go back to The Bot Platform. Click on the settings icon next to your webhook and paste in the URL you just copied from Zapier. You now have your webhook set up!
Step 6:
Now we need to test our web hook so we can set up the rest of the zap. Go back to the dashboard for your bot and click test next to your welcome message. Test your bot and make sure the message flow is as expected. Once you reach the final message ‘Great, lets look up the weather’, head back over to Zapier. Click on ‘Test this step’ and you should be able to see the hook data you have just submitted through your bot.
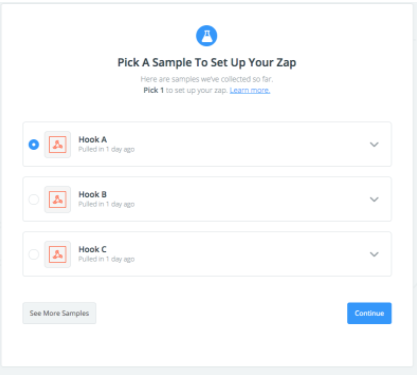
Select your most recent hook and select continue.
Step 7:
We now need to turn the text based location your user inputs, into longitude and latitude coordinates that we can then use with the zapier weather look up. To do this we need another Webhook. Set your Zapier action app as a webhook. This time, we need to use a custom request, instead of catch.
In the next screen, we need to set the method as a POST method.
We now need to post our user entered location to Google Maps in order to pull back the longitude and latitude. Google maps have a really well documented API. This means we are able to get location data in many different formats.
To get a Google Maps API key, you need to go here and follow the instructions: https://developers.google.com/maps/documentation/javascript/get-api-key
An API key is free to obtain and allows you thousands of free calls before you need to pay.
Step 8:
We now need to use the API key we have just opbtained in our zap. Paste the below in the URL box on Zapier. We need to get the geocode for our location so we should use the URL in the format:
https://maps.googleapis.com/maps/api/geocode/json?address=ADDRESS&key=YOURGOOGLEAPIKEY
Replace the Your Google API key text in the above URL with your Google API key.
Instead of the text ADDRESS, click the + icon on the right of the and select the user attribute ‘Location’ pulled through from your bot.
By the end, your URL should look like the below:
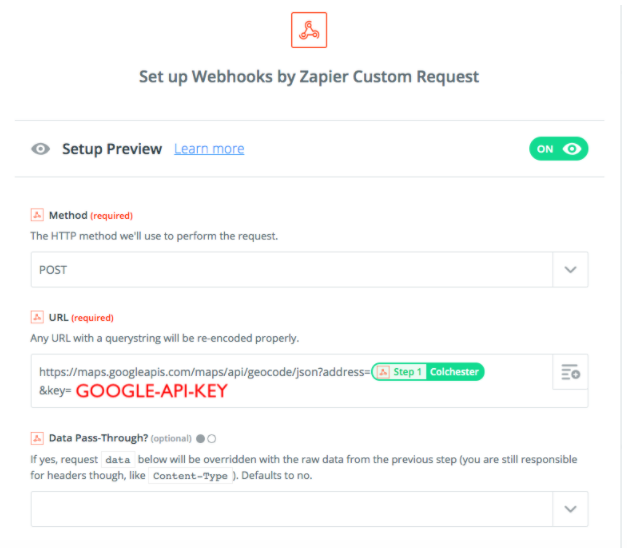
Click continue at the bottom and test this step. You should see that you get a long list of data returned, which includes several mentions of longitude and latitude.
Step 9:
Now we want to set up our weather look up.
For this we need to choose Weather by Zapier as our next connection.
Select the get current weather option and click continue
On the next screen, we can select the longitude and latitude readings we have just pulled from Google maps. Click the + option on the right of the bot. Select your custom request and from the full data, choose the Results Geometry Location Lat and Long to match your latitude and longitude fields.
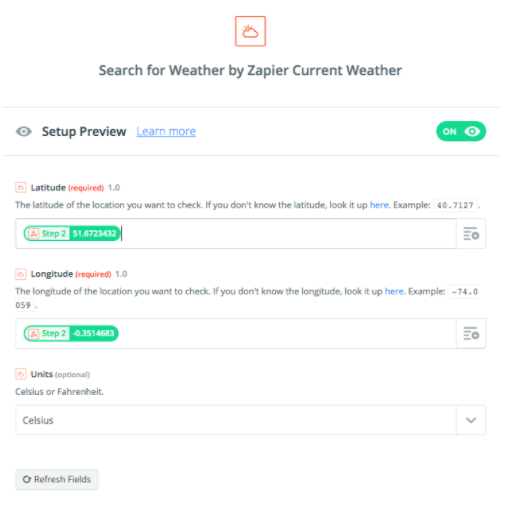
Click continue, test your step and then continue again.
Step 10:
Now we need to pass all of the data back to our bot.
Again, we will use a Webhook to do this. Add another action step and choose webhook from the options. We need to use another custom request.
We will use Facebooks own messenger API for this part. We need to set up a POST method. Our URL this time, will make use of graph.facebook.com.
The URL will take the format
https://graph.facebook.com/v2.6/me/messages?access_token=INTEGRATIONACCESSTOKEN
Your integration access token, is the same one you used when setting up your bot to integrate with workplace. To find it, you can go to integrations on workplace and click the Access Token button. Please note, that if you click the reset access token to get one, you will need to update the access token for this bot on the bot platform too or else your bot won’t be able to access your workplace account.
Paste this link into the URL box.
This time, we need to add how we want our data to be formatted by adding content in the data box. You can use as much or as little data from the weather forecast as you like. Here is how we have chosen to format our data:
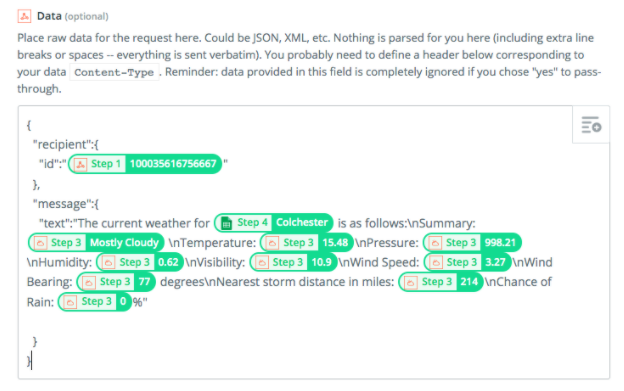
Now click on continue and test this step and it should push a message back to you on workplace chat. Click finish and your bot is now set up and good to go.
Updated over 4 years ago
