
Submitting a ticket to ServiceNow using bots
In this tutorial, we will configure a Make flow to submit a ticket to ServiceNow using The Bot Platform.
Knowledge Level: Intermediate
Purpose
In this tutorial, we will use a bot to submit a ticket to ServiceNow. A bot will capture the ticket information in attributes. At the end of the submission, we will post this information to a webhook in Power automate, which will pass on the information to ServiceNow. A ticket reference number will be returned to the bot user for reference.
Prerequisite
- A bot
- A Power Automate account
- A ServiceNow account that has the correct permissions (See ServiceNow API documentation)
- Your favorite beverage (Coke Zero with a few slices of lemon)
Setting up the bot
For this use case, you need two message parts:
- A message to capture the short description of the issue
- A second message to capture a detailed description of the ticket
- A message to capture the priority level
Setting up the Power Automate flow
We will use the following modules in our flow:
- Webhook - To receive the request from your bot
- ServiceNow (Create a record) module - To submit the ticket details to ServiceNow
- Webhook response - To return the ticket number to the user
Step 1 - Setup Webhook in Power Automate
First we need to create an ‘Instant cloud flow’ and use ‘When an HTTP request is received” as our initial module in the flow.

You won’t readily obtain the webhook url, temporarily we will click on ‘Next Step’ and add a ‘Response (Premium)’ model. It will look as following:

If you are setting up a webhook using Power Automate for the first time, please visit this guide for details on how to obtain the Webhook URL as well as the JSON schema coming through the platform -> https://dev.thebotplatform.com/docs/how-to-set-up-and-use-webhooks-in-power-automate-microsoft-flow
Copy the webhook URL from the module and paste it into the bot's last message part where the user completes submitting the ticket information.
Step 2 - Configure the ServiceNow module in Make
In this step, we will add the ServiceNow module to our Power Automate flow. Here, we will use the attributes incoming from the webhook and create our ticket in ServiceNow.
This is the module where we will input our ticket details, using the information we collected from the bot when a user enters the ticket information. In this example, we collected:
- Short description of the ticket
- Detailed description of the problem
- Urgency level (Low, Medium or High)


For this example, we have captured limited information for the ticket. Depending on your use case and internal business processes, a number of fields can be captured via the bot and passed on to the ServiceNow module in Make.
Step 3 - Setup Webhook response
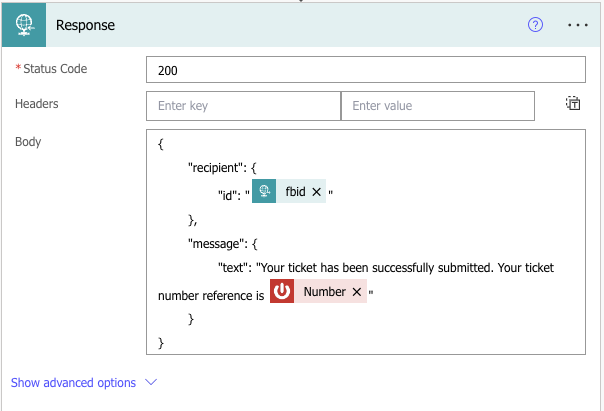
This is the last module in this flow. This step enables us to respond to the bot user with a confirmation that their ticket has been registered in ServiceNow and provides them a reference for further follow up. Start by adding a webhook response module in the flow.
You can compose the response message in anyway you would like or use the sample code below:
"{
  "recipient": {
    "id": "{{1.fbuser.fbid}}"
  },
  "message": {
    "text": "Your ticket has been successfully submitted. Your ticket number reference is {{7.task_effective_number}}"
  }
}"
Here's how the configuration looks on Power Automate:
After configuring the last module, save your flow and turn it on. If everything was setup correctly, the bot should respond with a ticket number at the end of the flow. The ticket should appear in the ServiceNow incident portal:


Learn more
If you enjoyed this tutorial and would like to build awesome integrations like these, Drop your details below and we'll be in touch
Updated about 1 year ago