Create a Timesheet and Time Tracking Bot
In this tutorial we make use of Clockify. Clockify allows you to track the time spent working on different projects through a timer system.
In this tutorial we make use of Clockify. Clockify allows you to track the time spent working on different projects through a timer system. You can allocate projects to certain clients and then assign billing to the time spent or alternatively just use it as a timesheet for your staff. Clockify is free to use. We will also use Make(formerly Integromat), a piece of middleware software that allows your bot to talk to Clockify.
Step 1 - Creating the bot
First we need to create a bot that allows us to complete four options:
Create a client
Create a project
Start a timer
Stop a timer
We will assume in this tutorial that you know how to create a bot using the bot platform. We will summarise the information you need to collate in each journey below.
Create a client
In this flow, you need to gather the name of the new client. We have a simple two step message journey that asks for the name of the client and stores this as an attribute $newclientname and then takes you to a message called client added, which contains a webhook.
Create a project
Projects have to be saved under a client in Clockify, so you will need to create a client before you can create a project. In this flow, we need to search for the name of the client you would like to save the project under and store that in the attribute $client, then we need to ask for the name of the new project and store this as attribute $newprojectname and finally we need to go to a message called project added, which contains a webhook.
We also need to create a message called client not found, which will be presented to the user if we cannot find the client they wish to assign the project to within Clockify.
Start a timer
Timers are assigned to projects, so we need to create a flow which searches for the project to record time against and save this as attribute $project, we then need to go to a message called timer started, which contains a webhook.
You will also need an error message called project not found, which will be presented to the user if the project they searched for cannot be found in Clockify.
Stop a timer
Stopping a timer is really simple. You can include a stop the timer button within your menu which simply goes to a message called timer stopped, which includes a webhook.
Step 2 - Creating a client using Make(formerly Integromat) and Clockify
We have a simple two step bot message journey that collects the name of the new client to be created and stores this in an attribute called $newclientname, and then sends the user to a message called ‘client added’ which contains an Make(formerly Integromat) webhook.
The scenario in Make(formerly Integromat) looks as follows:
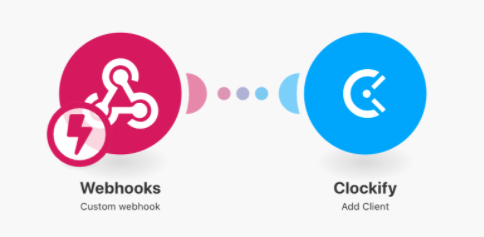
First we need to create a webhook and copy that new webhook into the message ‘client added’. Then you need to run your scenario to pull through the data from your bot. Now we need to add an ‘Add Client’ from Clockify module to our Make(formerly Integromat) scenario. You will need to add in your login details for Clockify by adding a new connection. Then you can select your user account from the Workspace ID and then use the $newclientname attribute pulled through from your webhook to populate the new client name, as shown below.
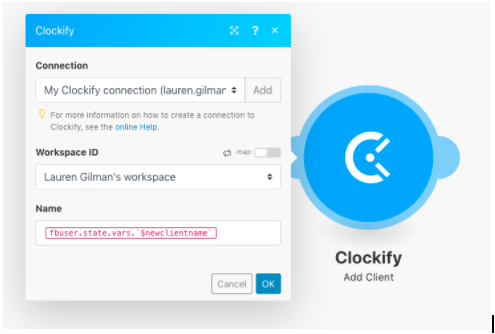
Now turn on this scenario and your add new client journey is complete.
Step 3 - Create a project using Make(formerly Integromat) and Clockify
For this process, we have a message flow that asks the user for the name of the client they wish to add a project to and save that under the attribute $client. We then ask for the name of the new project to be created and save that under attribute $newprojectname. Finally that goes to a message called project added, which contains a new webhook. We also need to create an error message in case the client cannot be found during the search.
The Make(formerly Integromat) scenario for this process looks as follows:
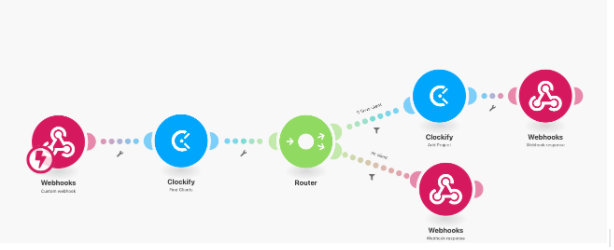
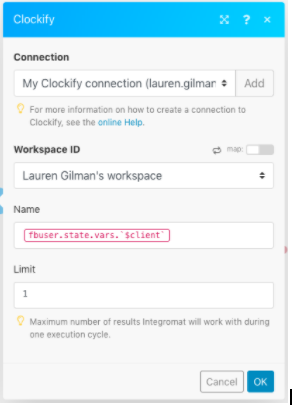
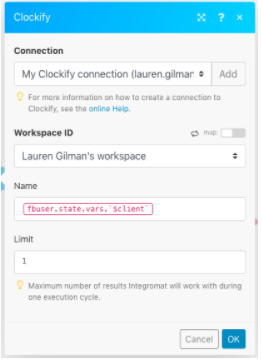
First create your webhook and add it to your project added message on The Bot Platform. Run the scenario and test your bot. The next step is to add a module that searches for the client entered via the bot. You need to use the $client attribute in the name field. Your module should look as follows.
You need to add in a router module to ensure that it has a flow if the client is found and one for if the client is not found. First, we will tackle the flow if the client is not found. Add in a webhook response module and include the following in the body:
{
  "recipient": {
    "id": "{{2.fbuser.fbid}}"
  },
  "message": {
    "id": "@BP:MESSAGE:XXXXX"
  }
}
Replace the XXXXX with the message number of your error message within the Bot Platform. Now we need to add a filter to ensure that this flow only happens when the client is not found. Add a filter that means that process only runs when the number of bundles found in the search for a client step is less than 1, as follows.
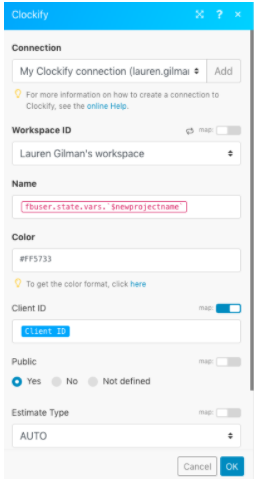
Now set up the flow for when the client is found. Add a Clockify module that adds a project. Select your workspace and in the name field, choose your attribute $newprojectname and in the client field, use the client id pulled through from your client search module. You will also need to set a hexadecimal colour for the project.
We now want to include a webhook response that provides feedback to the user to confirm their project has been added.
Finally we need to add a filter to this branch that means it is only triggered when the number of bundles in the client search module is 1 or more.
Step 4 - Start a Timer
In this stage, we need to ask the user for the project they would like to record time against and then confirm that the timer has started. We also need to include an error message if the project they have searched for isn’t found.
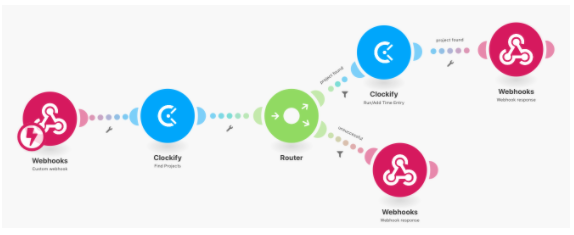
First create a new webhook and add that to your timer started confirmation message in The Bot Platform. Run the scenario and test your bot. Now you need to add a module that searches for the project stored in the attribute $project. You then need to add a router module to ensure that we check that the project is found and provides an error message if not.
If the project is not found, we need to add a webhook response, that returns the project not found error message you created. Add a filter to this step that ensures that the number of bundles found in the find projects module is less than 1.
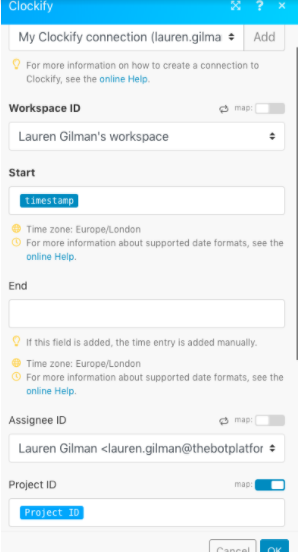
In the project found flow, we need to use the Clockify, start timer module. You want to set the start time to be the current timestamp. The project ID is the one pulled through from your find projects module. The set up of this module is as follows:
We then want to provide a webhook response that confirms that the timer has been started.
You need to put a filter on this flow to ensure it is only triggered when the number of bundles in the find project is 1 or greater.
Step 5 - Stop a timer
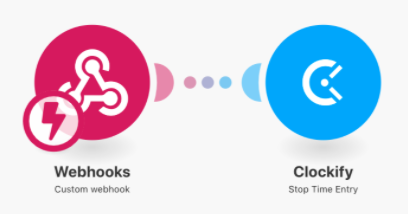
This step is the simplest as it only requires the user to click the stop timer option in the menu. They are then taken to a message called timer stopped that contains a webhook. This webhook then connects to the stop timer on clockify module. This module only has one step that stops the current live timer.
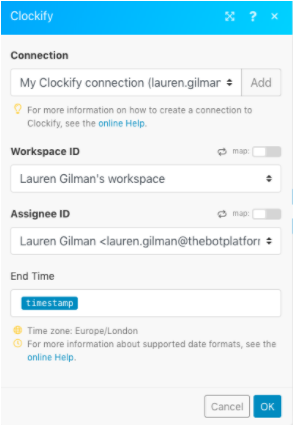
Your bot and flow are now set up and ready to go.
Updated 9 months ago
