How to Build a Bot That Adds Data To A Google Sheet Using Zapier
In this tutorial, we explain how to build an easy voting bot that automatically populates a google sheets document. This tutorial uses Zapier and The Bot Platform.
One of the most requested features of a bot on Workplace is the ability to integrate with Google Sheets. There are an estimated 160–180 million Google Sheets users, and for those of you who live and breathe by the cloud-like we do, this tutorial is for you.
In this tutorial, learn how you can easily build a voting bot that automatically populates into a Google Sheet.
Knowledge Required: Intermediate
You need a good working knowledge of how to create a bot and basic Google Suite knowledge.
What you will need:
A computer
A Workplace instance and page with admin access
A Zapier account
A Google spreadsheet
Step 1: Before you do anything you need to create an account on https://app.thebotplatform.com/
Then you’ll need to create a bot by following the instructions on our blog on how to set up your bot on Workplace.
You can pick a template, but for this example, we are starting with a blank bot so click skip template.
Step 2: Now you have created your bot, it is time to start building. The next screen will take you to the welcome message section. Click the text icon under the add message option. In this box, you explain the vote and ask users to pick their favourite option. E.g. in the below example we are asking about crisps and chocolate.
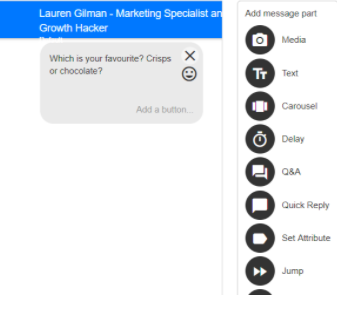
Step 3: Now we need to add in the voting options. Select quick reply from the add message part menu. Add two new quick replies as below.
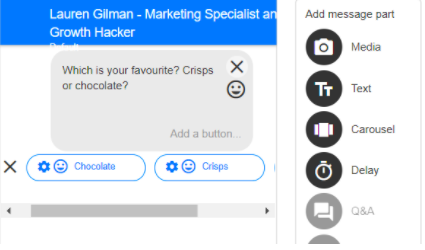
Step 4: We now need to set a user attribute depending on which option the user votes for. Click on the cog icon next to chocolate. In the first drop down, select the option, Save user attribute and send a message.
In the next box that appears, you need to create a new user attribute called Food. You then need to set a tag, which in this case is chocolate. In the final box, you then tell the bot which message it needs to display, once the user has voted. In this case, we are going to create a new message called end poll. Once you have done this, hit save.
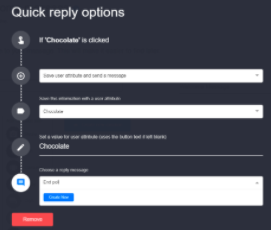
Step 5: We need to repeat the above for the crisps quick reply button. Click on the cog and select Save user attribute and send a message. Set the attribute to be the food attribute you created when setting up chocolate. Now make sure you tag this value with the value crisps. Finally, set the message to be end poll as above. Once you have done this, hit save. Then on the bot window, hit save at the bottom again.
Step 6: You will now be taken to the messages page, where you can see end poll has been created. Click edit next to this message. You can now put in a message that your end user can see once they have voted by adding a text type message.
Now for the google sheets integration. Click to add a webhook to your bot. Then click on Click to configure. You will see that a URL field comes up. Now we need to switch over to Zapier to set up our integration.
Step 7: Login to Zapier and click on add a zap. Under choose a trigger app, select webhook.
Under Select webhook trigger, select Catch hook. You will then be given a URL by zapier. Copy and paste that URL into the URL field on your bot page.
Step 8: Save your bot and select the push changes live button at the very top of the dashboard page. This pushes all changes to Facebook. Now we need to test our bot to push some data through and test our zap is set up. Click the test button next to your welcome message item and test out your bot. Once you have tested it, switch back to zapier and click the Ok I did This button.
You should now see the below. This shows that it has pulled through the sample data from your test.
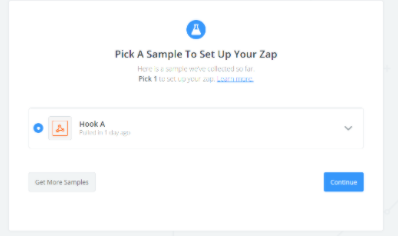
Click on the continue button.
Step 9: Now we need to set up our Zapier action. Select google sheets from the action app list. In the select google sheets action, select Create spreadsheet row and continue. You will need to link your google sheets account in the next step. Once you have done this, you will then be taken to the following window.
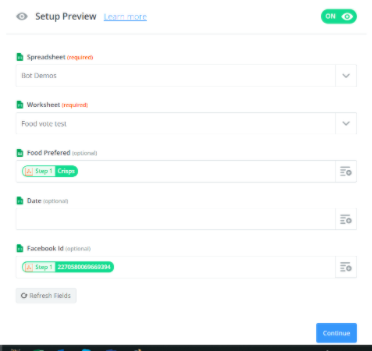
Step 10: You will need to set up a google spreadsheet ready to take your results. You will also need to set up the columns to store the data in e.g. The food preference and the Facebook ID.
Now we can populate the above step in Zapier. In spreadsheet, select your new spreadsheet. Select the worksheet in that spreadsheet that contains your new column headings. Under food preferred, select the user attribute ‘food’ that you set up in your bot. Under Facebook ID, select the Facebook ID that is pulled through by the webhook.
Click continue and your google sheets integration will be tested. You should now see the data from your test appearing in your spreadsheet. Go back to the bot builder and test your bot again and you will see more data appear in your spreadsheet.
Updated 6 months ago
